Git Workflow
Enhancements, bug fixes, documentation improvements, etc. for Brigade or any related project may be proposed in the form of pull requests (PRs).
This section provides a basic introduction to the process of forking and cloning the canonical Brigade repository, then opening a new PR. We will also discuss the PR review process and some tips to improve the chances of your PR being accepted and merged.
If you’re already a seasoned Git/GitHub pro, you may wish to immediately move on to reading about signed commits.
⚠️ Although this section will use the Brigade repository for purposes of illustration, this content is equally applicable to any Brigade-related project owned by the @brigadecore GitHub org.
⚠️ If you prefer learning through video, check out the video adaptation of this guide on our YouTube channel.
Forking the Repository
We begin with an assumption that you already have a GitHub account and are logged into GitHub. If this is not the case, you can create a free account here.
If you’ve not already done so, visit the official (i.e. “canonical”) Brigade repository in your browser and use the Fork button in the upper right hand corner of the page to create a copy of this repository under your own GitHub account.
Cloning the Repository
In this section, we’ll begin with an assumption that you already have the git
CLI (command line interface) installed on you computer. If you don’t, we’ll
assume you’re capable of installing it without our guidance. More information is
available here.
-
In your browser, navigate to your fork of Brigade. This will usually be found at a URL of the form:
https://github.com/<your GitHub handle>/brigade. -
Toward the upper right hand corner of the page, there is a bright green Code button. Clicking this will expand a menu. On the Local tab of that menu are two options: HTTPS and SSH. Click either of these to expose the corresponding URL in the box beneath. Either of these URLs may be used. SSH is generally the superior option, but requires some setup that we’re not discussing here. You can read more about that here. Click the icon to the immediate right of the URL to copy it to your clipboard.
-
In your terminal, navigate to a location in your file system where you’d like to create a copy of the Brigade source code.
-
Use the following command to clone your fork:
$ git clone <URL from your clipboard>Then change into the new
brigade/directory:$ cd brigade -
Using the following command, you should be able to see a git “remote” named
origin. This is essentially a connection to the fork of Brigade in your GitHub account.$ git remote -v origin git@github.com:<your GitHub handle>/brigade.git (fetch) origin git@github.com:<your GitHub handle>/brigade.git (push)We will also want a remote for the canonical Brigade repository. This remote is commonly named
upstream. Use one of the following commands to add it:SSH:
$ git remote add upstream git@github.com:brigadecore/brigade.gitHTTPS:
$ git remote add upstream https://github.com/brigadecore/brigade.gitBoth the
originandupstreamremotes should now be available:$ git remote -v origin git@github.com:<your GitHub handle>/brigade.git (fetch) origin git@github.com:<your GitHub handle>/brigade.git (push) upstream git@github.com:brigadecore/brigade.git (fetch) upstream git@github.com:brigadecore/brigade.git (push)
Understanding the Basic Workflow
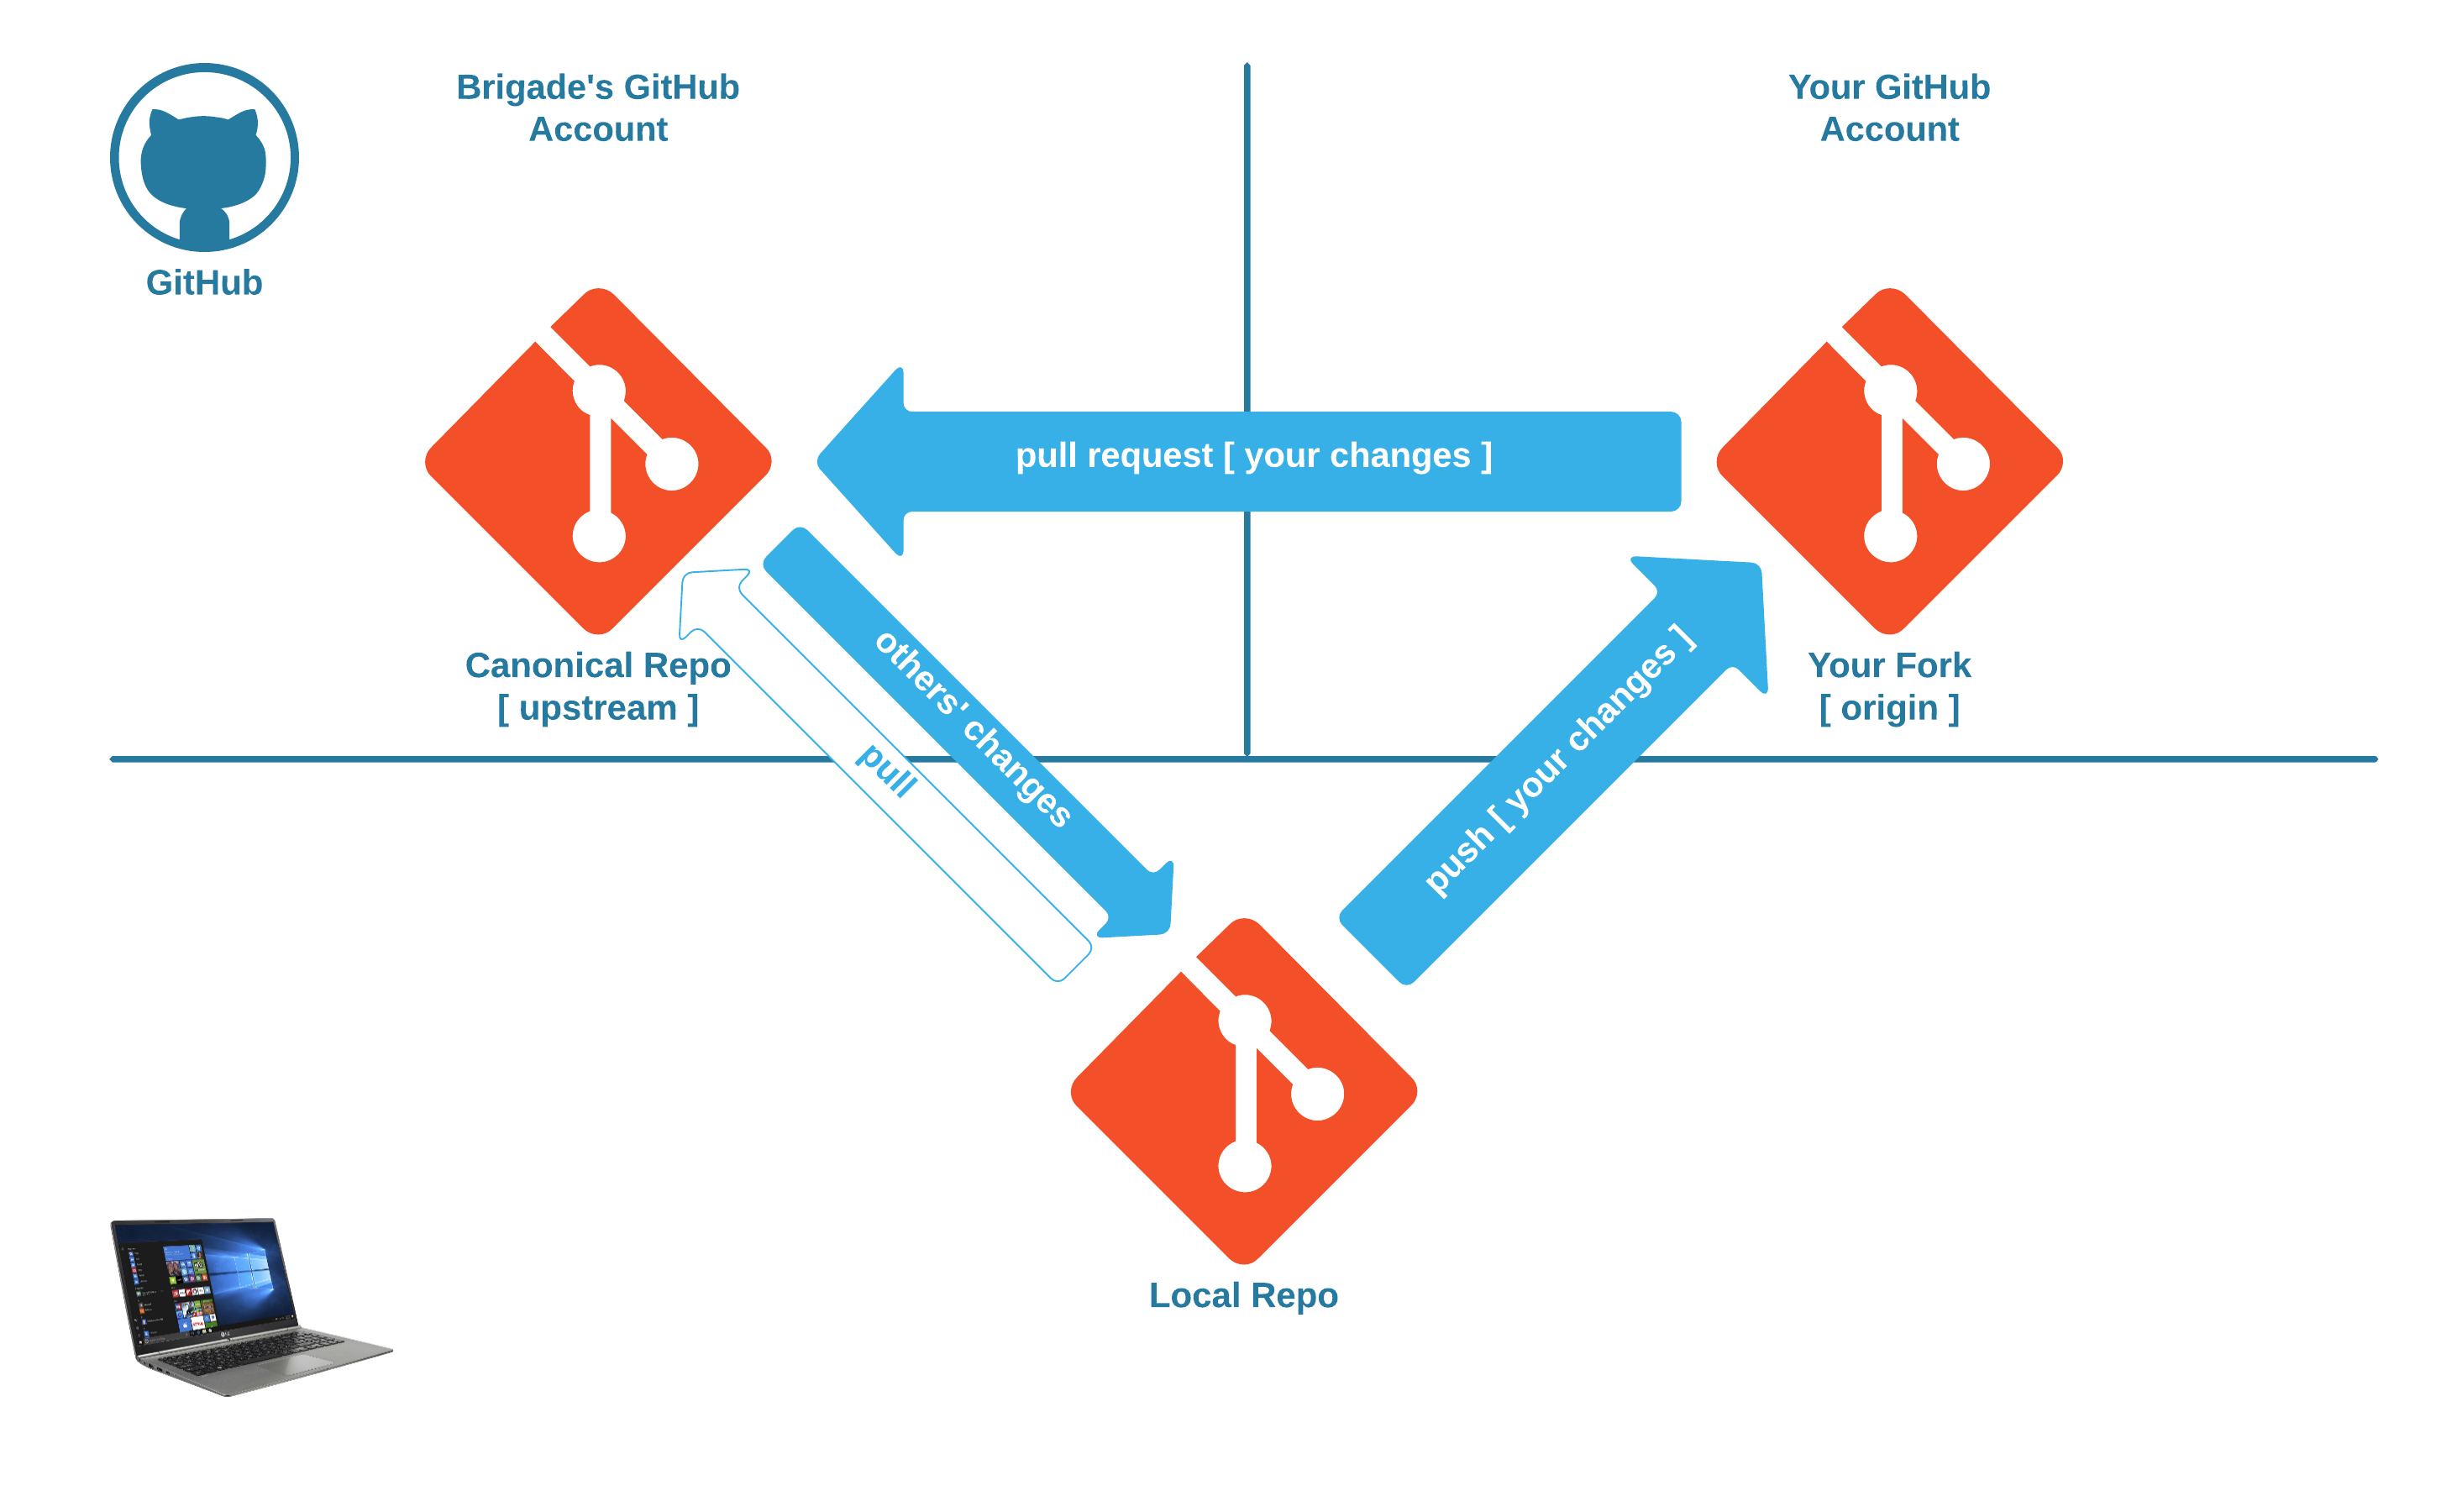
The reasons for having two remotes, with one (origin) connected to your fork
and the other (upstream) connected to the canonical Brigade repository are
that:
-
All contributors, except project maintainers, lack write access to the canonical repository. When you want to propose changes to Brigade, you will do so by first pushing those changes to your fork (
origin) and then opening a pull request. (More on this later.) -
When starting work on a new enhancement, bug fix, etc., you will typically want to use the latest code from the canonical repository as your starting point. The
upstreamremote permits you to sync the latest changes from the canonical repository to your local clone of the code.
The general workflow, thus, looks like this:
Making Changes
Although we just established our upstream remote that connects us to the
canonical repository, it is a good habit to establish early on that new changes
are made using the latest code from the canonical repository as the starting
point, so we will start by pulling the latest changes from upstream:
$ git pull upstream main
Now create a new branch in which to make your changes:
$ git checkout -b <branch name>
Proceed with making the desired changes. At this point you may wish to consult other sections of the documentation, including our design docs, and instructions for hacking on Brigade.
Committing, Pushing, Opening a PR
Commands git status -s and git diff permit you to review all the pending
changes in your feature branch.
When everything looks good, stage the changes for commit. This can be done using
the git add <path> command. You can add individual files to be included in
your upcoming commit, or alternatively, if you intend to include all your
modifications in one single commit, you can simply use the following:
$ git add .
To make a commit:
$ git commit -m "brief description of the commit" --signoff --gpg-sign
⚠️ The command above includes the application of two different types of signatures to your commit. This is discussed in greater detail in the signing doc.
Once all relevant changes have been committed, push your feature branch to your fork:
$ git push origin <branch name>
Finally, visit either the canonical repository or your fork in your browser. When visiting either page, GitHub will detect the recent changes you have made in your branch and prominently display a message box inviting you to open a pull request. Click the Compare & pull request button. The remaining steps for opening your pull request will be self-evident.
⚠️ Before beginning work on another feature, be sure to use
git checkout mainto return to themainbranch andgit pull upstream mainto sync with the latest changes from the canonical repository.
The Review Process
Once your PR is open, Brigade project maintainers will prioritize and review your proposed changes. Our continuous integration process will also run a battery of automated tests against your PR to help validate your proposed changes. Maintainers may accept your PR, request amendments (additional changes) to it, or, in rare cases, reject it.
Project maintainers have ultimate responsibility for what changes are merged into the project. Please be patient if it takes some time for your PR to be reviewed or if changes are requested. This is all a normal part of the quality control process and it is essential to preserve the confidence that Brigade’s users have placed in Brigade and its maintainers.
Tips for Opening a Successful PR
-
Make sure your PR’s description clearly and succinctly summarizes the changes proposed by your PR.
-
Resist the temptation to bundle unrelated changes into a single PR. Discrete PRs are easier for maintainers to review and sign off on.
-
A larger PR is more likely to be merged if it references and addresses an existing issue from the issue queue. Being able to link your PR to an existing issue can give you confidence that the changes you’re proposing are welcome. If you’re unsure how a particular change will be received, open an issue to start a discussion with maintainers before investing a lot of time making the changes. Being formally assigned to an issue by a maintainer can also prevent the duplication of effort than can occur if both you and another contributor were to be working on similar changes in parallel. If you see an open issue that you’d like to work on, just ask for it to be assigned to you.
For very small PRs – ones that address minor bugs or typographical errors, for instance – it is not necessary to link to an existing issue. A good rule of thumb is that if it would take you more time to open an issue than to just fix the problem, then go ahead and open a PR without worrying about an issue.
-
All commits must bear a DCO signoff and must be verified. These strict requirements are described in greater detail in the signing doc.
-
Larger PRs are easier for maintainers to review if they’re decomposed into several logical commits that can each be understood and reviewed independently. If you’ve taken the time to do this, be sure to explain in the PR’s description how you have broken it up. This alone can make larger PRs much more approachable.
-
The hacking doc addresses a number off the different tests you can run against your changes. These are also run automatically as part of our CI process. Executing applicable tests locally, prior to opening your PR, can maximize the chances that the CI process will not uncover avoidable problems.
-
If you amend your PR (push additional changes) after it is open, it is generally better to do so in the form off additional commits, as opposed to amending the existing commits. If a maintainer already has a review in-progress, your additional commits are just additional, incremental changes to consider. If you’ve changed existing commits, on the other hand, this may force maintainers to restart their review from scratch, which creates more work and can delay your PR from being merged in a timely manner.